
This Tutorial was written by Amy aka HerRoyalTagstress on June 7, 2009. It's concept is copyrighted to Amy aka HerRoyalTagstress. You may print this tutorial for you own personal use, but please do not copy it in anyway to put online, pass out, rewrite, or claim as your own.This was written using PSP 8 but will work in other versions.
This Tutorial was written for those that have a working knowlege of PSP.
Supplies Needed:
Tube of choice, I’m using one from Ismael Rac, you can get it from his website.
Frosted Velvet Scrap Kit you can purchase it from ScrapsbyDmg
Mura’s Meister Copies Download it from HERE
1. Open new Image 600X600 (you can resize later) Flood fill white.
2. Open Frame 8 from the kit. Resize 65% copy and paste to your blank canvas.
3. Using your magic wand click inside your frame. Selections modify expand 2.
4. Open paper 9 copy and paste. Selections invert delete. Move below your frame layer.
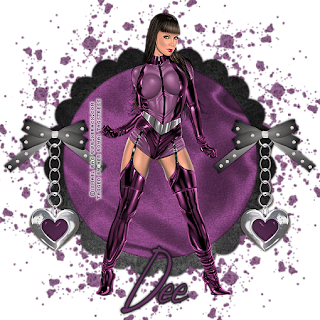
5. Copy and paste your tube as a new layer, resize and place to your liking.
6. Add a drop shadow of H&V 0 Opacity 100 Blur 5 to your frame and tube.
7. Open Charm4 resize 25%. Copy and paste to your tag.
8. Apply the same drop shadow as above. Duplicate – Image – Mirror.
9. Open Bow13 resize 50%. Copy and paste to your tag. See mine for placement. Apply same drop shadow. Duplicate – Image – Mirror.
10. Open glittersplat 3. Paste as a new layer. Move above your white background layer. Resize 50%
11. Apply Mura’s Meister Copies using the following settings.(click image to make it larger)

This Tutorial was written for those that have a working knowlege of PSP.
Supplies Needed:
Tube of choice, I’m using one from Ismael Rac, you can get it from his website.
Frosted Velvet Scrap Kit you can purchase it from ScrapsbyDmg
Mura’s Meister Copies Download it from HERE
1. Open new Image 600X600 (you can resize later) Flood fill white.
2. Open Frame 8 from the kit. Resize 65% copy and paste to your blank canvas.
3. Using your magic wand click inside your frame. Selections modify expand 2.
4. Open paper 9 copy and paste. Selections invert delete. Move below your frame layer.
5. Copy and paste your tube as a new layer, resize and place to your liking.
6. Add a drop shadow of H&V 0 Opacity 100 Blur 5 to your frame and tube.
7. Open Charm4 resize 25%. Copy and paste to your tag.
8. Apply the same drop shadow as above. Duplicate – Image – Mirror.
9. Open Bow13 resize 50%. Copy and paste to your tag. See mine for placement. Apply same drop shadow. Duplicate – Image – Mirror.
10. Open glittersplat 3. Paste as a new layer. Move above your white background layer. Resize 50%
11. Apply Mura’s Meister Copies using the following settings.(click image to make it larger)

12. If you want to resize your tag now is the time to do it.
13. Add your name and copyright information.
As always I would love to see your results.
No comments:
Post a Comment