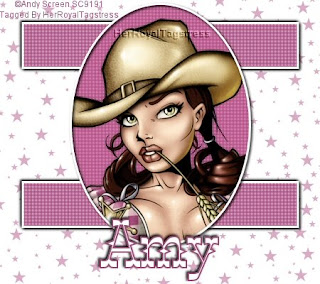
Here it is! My very first Tutorial. Enjoy
Seeing Stars
This Tutorial was written by Amy aka HerRoyalTagstress on April 8, 2008. It's concept is copyrighted to Amy aka HerRoyalTagstress. You may print this tutorial for you own personal use, but please do not copy it in anyway to put online, pass out, rewrite, or claim as your own.
This was written using PSP 8 but will work in other versions.
For this tutorial you will need:
PaintShop Pro
Penta Dot and Cross plugin. You can find it HERE
Brush by Brushes by Pange. Blanket of Stars
Font of Choice
Tube of choice. I am using the art work of Andy Screen. You can purchase a license to use his work at MPT. Do not use this image unless you have a license.
Okay Let's begin.
Open a 450X400 transparent canvas. Flood fill with White.
New raster layer. Select your paint brush. Set it to the Blanket of stars brush. Cover the canvas with stars. I used color #D9ABC4.
Grab your preset shape tool. Set it to rectangle, anti-alis and create as vector checked, line width 3. Set your foreground to white and you background to a color from your tube. I used #A24A78.
Draw out a long rectangle (see my tag). Move it to the top of your tag. Convert to raster. Apply the Penta Dot and Cross filter with these settings: Amount 122, Cross Distance 6, Cross Width 0. Apply a drop shadow of H&V -2, Opacity 100, Blur 5, color Black. Apply the shadow again, this time changing the H&V to 2.
Duplicate your rectangel, Image, flip. Move it towards tht bottom of your tag. Don't worry to much about its placement, you can use the mover tool to adjust it later.
Using your preset circle shape, set you foreground to white and your background to Null. Draw out an oval (see my tag). Position your oval and rectangles the way you want them. Convert your oval to raster.
Hide you rectangle layers. Grab your magic wand, make sure that you are on the oval layer, click in the middle of you oval. Selections, modify, expand by 2. Flood fill with the same color you used for your rectangle. DO NOT deselect. Apply the Penta Dot and Cross filter, same settings as before. Still do not deselect. Apply the same drop shadows as you did on your rectangles. Still do not deselect.
Copy and paste your tube as a new layer. Position it so the part of the tube you want to use is inside of the marching ants. Selections, invert and hit delete on your keyboard. Selections, select none.
Merge all layers visable.
Add your text. Apply the same drop shadow as you did for your rectangles and oval.
Add your copyright.
All done. I hope you enjoyed my 1st tutorial. I would love to get feedback about this tut and would love to see your results. Email them to me HERE.

No comments:
Post a Comment